Below are the guidelines for Custom Reports:
- At minimum, users will need the below permissions at the account level to run, create, and edit Reports from Module > Reports.
- LMS: Accountreport
- MOC: MOCUser
- ACT: ACTUser
- CSM: CSMaccountreport
To verify a user's report access, navigate to their user under LMS > People > People Information.
Click on their company, division, and account tabs, they should have report access marked as "Yes" in at least one of these locations.- Custom Reports can be shared with other administrators by clicking the checkbox "Shared Report".
- Within the reports folder, custom reports will appear on the left while standard reports will be on the right.
- Every report type has a brief description providing a use case for when you would leverage the report.
- Reports can only display 16,000 records at a time. If you exceed that limit, a message will be displayed recommending more filters be applied.
How to Format a Custom Report
When building or editing your report, you will have the below options to set by default when you run the report:
- Field Title: Click into the field title to customize how it displays in the results
- Sort: Apply sorting by ascending or descending
- Group: Results will be grouped by the same responses for that field
- Total: Results will be totaled
Example: You can total the hours credited for certain records in training items to total how many hours users spent taking a course.
- Filter: Apply filters by default to the select field. Below are the filter options:
- None
- Equal To
- Not Equal To
- Contains
- Does Not Contain
- Starts With
- Ends With
- In List (Functions as a "any of the following" option)
Example: If you are searching for records for only SCORM , WBT and DOC item types.
-
- Not In List (Functions as a "not one of the following" option)
-
- Is Empty
- Is Not Empty
- Date Fields
- Click into the text box to enter in a specific date range.
- Click the calendar icon besides the text box to create a dynamic date range.
- Eye Icon: Select this button to hide fields from the report results. Hidden fields will still be used to calculate the results.
How to create a Custom Report:
- Click on the desired module in the top left
- Click on Reports
- Click the title of the desired custom report.
- Click New Report in the top right
- Enter a name and Description
- Click Shared Reports if desired to make your report public.
- Select the down arrow next to "select report fields"
- Select the checkbox(es) beside the desired fields.
- Select Add Selected Field(s).
- Apply at least one filter to one of the fields you have added.
- Click Save Report
- Then click, Run Report
Custom Report Detail Features:
Custom Reports can be saved, added to users' desktops, copied/run by other administrators, and sent to users email as a one off or on a scheduled job.
- Click on the desired module in the top left
- Click on Reports
- Click the title of the desired custom report.
This will bring you to the Report Details screen where you can run and manage existing reports.
- Click Show Shared Reports to view, run and copy reports other Authors have shared with you.
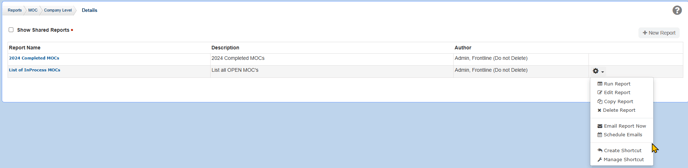
- Run Report: Run desired report. You can also click on the title of the report.
- Edit Report: Edit your own report. If you are not the author, you will not be able to edit the report.
- Copy Report: You may copy another author's report (and your own) to then become the author and edit the report.
- Delete Report: Select to remove report from the list. If you are not the author, you will not be able to delete the report.
- Email Report Now: Select this to deliver this email to any user with report access. You can edit the email subject and content.
- Schedule Emails: Select this to deliver this email on a scheduled job to any user with report access. You can edit the subject, content, frequency, date, time and recipients.
- Create Shortcut: Select to place the report on your users' desktop.
- Manage Shortcut: Select to add and remove the report from users' desktops.
Navigating the report results screen:
- Export the report to an excel sheet, PDF or Print by clicking on the respective icon in the top right.
- Navigate back to the edit report screen with the back arrow in the top right.
- Click on the column header to sort by ascending or descending.
- Click on the title of the MOC, ACT or LMS item when a blue hyperlink is shown to display more information like summaries.
- Drag and drop column headers below the search criteria (in the top left) to group the same results in that column together.
- Change the number of records displayed in the bottom left.
- Click on the "Show Filter" option in the bottom right to display temporary filter options for each of your column headers.